Bad Sector in Hard drive is common problem and it will cause hard drive crash in future. Bad sector happen when there is physical damage to a part of the hard drive. Auxiliary sectors technique is used in modern hard drive. When the Hard disk controller senses a bad sector in the hard drive, it rearranges that sector to another physical sector on the drive. But bad sector will increase day by day and in long run it may crush.
 |
| Hard Drive Bad Sector Map |
Bad sector wouldn't repair by High level Formatting with “Format” Command in Command prompt. Formatting in low level is an additional option but in low level formatting programs and tools to identify bad sectors and cleaning the disk may not proper functioning in such situation.
So, Bad sector recovery involve with both logically and physical recovery. Logical recovery can be solved by some software or operating system internal utility. But physical recovery is difficult and success rate is not satisfactory. So when it occurs, hard drive change is ultimate option after some days. So in this case backup your data first to another location then try with new hard drive.
If your operating system is windows then you may run Error Checking periodically to prevent your dive from bad sector. This feature of windows is very useful for logical bad sector recovery.
You may also use Online Data Backup utility (Award Winning SOS Online Backup: Receive 25% off the Personal-Home Package! ) to avoid hard drive inconsistency and bad sector related data lost. This backup utility provides
free trail to check performance, security and privacy. I suggest to use it because Data is 100% secure here with your privacy.So, Bad sector recovery involve with both logically and physical recovery. Logical recovery can be solved by some software or operating system internal utility. But physical recovery is difficult and success rate is not satisfactory. So when it occurs, hard drive change is ultimate option after some days. So in this case backup your data first to another location then try with new hard drive.
If your operating system is windows then you may run Error Checking periodically to prevent your dive from bad sector. This feature of windows is very useful for logical bad sector recovery.
You may also use Online Data Backup utility (Award Winning SOS Online Backup: Receive 25% off the Personal-Home Package!
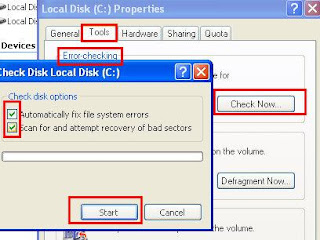
Steps for Error checking and Attempt Recovery of Bad Sectors are given below:-
1. Click on My Computer icon on desktop, select the disk drive that you want to diagnose and repair.
2. Now, Right click on your selected drive and select Properties from drop-down.
 |
| Recover Bad Sector and Fix error |
3. A new window will open; here you go to Tools tab.
4. Click on the "Check Now" button under "Error Checking Status".
5. Check the box "Automatically fix file system errors" or "Scan for and "Attempt Recovery of Bad Sectors."
6. Then click on Start.
Note: In case of boot drive (where operating system is installed, commonly used C drive), it must require Restart first then scan will automatically start on start-up of system. But no restart required for another drive.
I must say. After reading what I just read, you are an amazing author! Really, you use proper grammar, proper use of pronunciations, proper everything! I might also like to add and say that I think you pin pointed my style of writing as well which I adore! What I also like about your blog is that you give an opportunity for a wider variety of an audience to unravel the immense storyline of your writings.
ReplyDeleteGood Info
ReplyDelete